Showing posts with label go cutter. Show all posts

Wednesday, February 2, 2011

Design Wall & Creative Munchkin

Can I first say that I'm sick of cold and snow and I'm really ready for spring.

With that said here are a couple pictures of Grace. Since she hasn't been to school this week and has decided to get creative with fabric. I helped with the sewing but she did all the fabric picking and arranging, etc. and created her own little quilt top.

Creative Munchkin

Working


The thread kept breaking so we didn't get very far tonight. I think it's probably because she's moving the machine so slllllooooooowwwww and I turned the speed down. I think when we go back at it tomorrow I will turn the speed up a bit. Crazy thing is, she gets it. She made a flower on one of the first blocks. I asked what she was doing and she said Well making a flower of course. Such attitude.  :-)

On the design wall is another t-shirt quilt, which I will spare you pictures of. I'm working on a "I Spy" top. I used my Go cutter hexagon and triangle dies. So have I mentioned that I LOVE my Go cutter? I love working with the shapes that I wouldn't normally cut myself. Hexagons definitely on that list.

I Spy

The top has grown since I took the picture.  The hexagons are cut from 6" blocks that I cut from the remains of other baby quilts and just threw in a box. That's a perfect size to put on the die and not have a lot of waste.

School has been cancelled already for tomorrow.  I suspect we will finish quilting a quilt top and have pictures to show.

Have a great night.

Friday, July 30, 2010

Scraps - Go Chisel

I know someone is going to ask about waste or scraps since that seems to be the big issue/hang up that people have with the Go Cutter.  Yes there is going to be some waste.  I folded so that I could try to minimize the amount of waste though.  I've decided that I'm good with the scraps that are generated because I can use them to make string quilts or something along those lines.  There are enough free-form block patterns floating around in the blogosphere that I really am OK with any waste that might happen.

My picture below is what's left after cutting from a 1/2 yard of fabric.  Remember I was able to get 32 chisels that measure 3.5" wide by 6.5" long.  Because I'm some what challenged at math, I had my husband do the calculation for me.  If I cut myself, not using the Go Cutter, I would have been able to get 30.  Because the points are placed together on the die, I can get 2 extra.  I know that I can not cut like that on my own when it comes to a "funky" shape.


Thursday, July 29, 2010

Accuquilt Go - Making Braids using the Chisel Die

This is my first attempt at a tutorial so bare with me.  I'm just so excited about the Chisel die (55039) that I have to share.  I'm going to show you how to make a braid.  Since I haven't gotten very far with my strips, I can't show you the completed top, so you will just have to check back in with me in a day or two.

I used fat quarters and 1/2 yard cuts to get started with this project.  I folded the fabric in half the long way and then in half again.  So a fat quarter that's normally 18 inches wide is now about 4 1/2 inches wide because of the 2 folds.  When I cut the fabric I'm sure to have the chisel the normal direction and then another that is reversed.  With a half yard cut of fabric,  I can cut 32 chisels and 16 chisels with a fat quarter.
The instructions with the die say to cut your strips 6 inches wide.  When I folded, I folded so that the fabric to be cut was approximately 4 1/2 inches or less.  The chisel will measure 3 1/2 inches by 6 1/2 inches.  Because the die is on an angle, I felt safer having some extra fabric on the sides.
Once I cut all my fabric, I sorted it into piles so that all the chisels and reverse chisels were together.  For me, that makes it a lot less confusing when I start grabbing fabric pieces to sew my braid.
To start the braid I pick one of each chisel.  I've laid each one out and labeled as fabric 1 and fabric 2.  First I need to explain that I'm very right handed so I'm writing this and showing pictures that way.  You might night to move your fabrics around to accommodate being left handed.
 Place fabric 1 on the bottom so the chisel or slanted edge is facing right.  Next take fabric 2 and place it so that the slant is facing up.  Head to the machine to sew the 2 pieces together.  When looking at the picture above you will be sewing along the left hand side.  Because I would be sewing blind, I had to flip.
In the above picture, I had to flip the two pieces of fabric over so that fabric one is now on top.  The point of fabric 2 is up at the top of the picture, so if you were looking at the blue chisel without the red it would be facing so that the point is to the back of the machine.  Sew fabric 1 to fabric 2 along the right side using the normal 1/4 inch seam.
Take your pieces to the iron and press so that fabric 1 now points to the right.  I press the seam to the fabric 1 side.  It makes it easier when adding more pieces.
 You are now ready to start adding on to make the braid.  I lay the next piece down next to the sewn piece so that I can make sure that I've grabbed a chisel that is facing the right direction.  The trick of the braid is to get all the pieces together so that it makes a straight strip.  So once I know I'm okay with the direction of the chisel, I flip the fabric so that I'm ready to sew.
I've flipped the fabric over and will sew down the right side from the top to the bottom.  The die cuts off the tip of the triangle, which makes it a whole lot easier to line pieces up.  Once I have the next piece sewn, I head to the iron and press to the right again.  From there you just alternate sides (and chisel angles), adding a new piece as you go. 

I'm not sure yet how long I'm going to make my braids.  Once the length is determined, then you just sew the strips together.  A sashing piece could be placed in between the braids so that less braids are needed for a quilt top.  The ideas are endless.

When I have my braids completed, I will be sure to post more pictures so you can see how to line up the strips.

Let me know if you have comments or questions. 


Wednesday, June 16, 2010

Design Wall and a Flimsy

This is what I have on the design wall right now.  After I snapped the shot, I worked on more apple cores and put an outside row of brown and white blocks on the other. The apple core blocks were cut using my Accuquilt GO.  I love that little machine. The fun part of the Valentine quilt is that it started out as a disappearing 9 patch.  That block never fails to intrigue me.

This is my crazy drunkards path.  I used my Accuquilt GO cutter to cut out the blocks.  I LOVE that crazy little machine. OOPS, I think I might have said that once before.  It makes cutting so much easier for blocks with curves.  I LOVE that I get notches to make matching a breeze.  I cut the aqua border strip using the 2 1/2" die.  It's so much fun to run a yard of fabric through the machine and get strips that are straight and fast. Last night I cut another drunkard's path out.  It's from a magazine, so my blocks will be larger than the pattern.  A few adjustments with the borders and setting strips will be needed. 

I have to share the quilt ladder I got.  When I went to the Olathe Quilt Show, the Lil' Red Hen Quilt Shop had a booth set up.  I couldn't resist because the prices were so good.  The ladder is custom made.  I think there is about a 3 week turn around.  Mine is 7 feet tall.  Isn't it the coolest thing? 


Have a great Wednesday.


Monday, March 15, 2010

Design Wall Monday

The picture is from the right side of my design wall. It's apple cores that I cut using my Go-Cutter. Definitely going to be a challenge. I tried sewing a couple blocks together and I don't like my curves. Fons & Porter are going to have help. I remember seeing something on one of their episodes and in a magazine about the way you are supposed to sew a curve to be successful. I think I was doing it the opposite because it was rough. But due to my interruptions, I couldn't remember which way I sewed when I picked the next 2 blocks ups. I still have the horse quilt up on the left side. I'm starting to figure out why I've done nothing with this UFO for such a long time. It's brown and it's depressing. I need COLOR.

Today we went and painted ceramics. Very funny. Tomorrow is a trip to the mall. Grandma says she will be jumping on the bungee thing with Grace. I will be taking my camera to get video.

Have a great night.

Saturday, January 9, 2010

Eventful Weekend

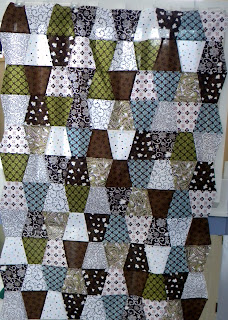
Well here is yet another tumbler quilt top that I made using my Go-Cutter. I think I'm going to go and check out other dies this afternoon.

Last night Miss G spent the night with grandparents, so we got to go to the movies - Avatar (3D). First, I've never been to a 3D movie so that was quite and experience. I really didn't think I would like the movie, but I loved it. I like science fiction, so this movie was great in terms of sci fi. My husband made the comment that James Cameron had dreamed of making this movie for a long time. It's awesome to think that someone can take something so out of the norm and turn into something so visually cool. After the movie we got to go for coffee. Then home to watch another movie - The Flying Scottsman. Great flick too, but you have to like bicycling.

Miss G turns 6 on Wednesday and she asked for a pink bedroom so we are painting this weekend. OH MY. It's going to take about 4 coats to cover the lavender that was on the walls. My hubby is there now putting the 2nd coat of primer. I'm hoping we can get one coat of paint on tonight.

Well, until tomorrow. I've been working on another top that was on my list. Hopefully I can get it all done tomorrow.

Posted by Picasa